


The Timbersled RIOT snow bike system can deliver a variety of handling characteristics, ranging from planted (limited weight transfer) to playful (increased weight transfer), depending on how the suspension is set up.
From the factory, the RIOT suspension is set to deliver a ride closer to the planted end of the ride spectrum. With RIOT, the rider can make simple changes to explore what suspension settings work best for them.
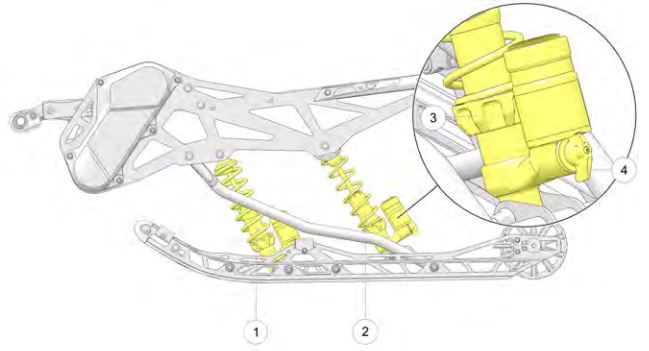
The best suspension setting depends on many variables, including the riding terrain and the rider's weight, riding style and individual preferences. The front (1) and rear (2) suspensions on your Timbersled RIOT snow bike are easy to adjust. You'll make adjustments using the spring preload adjuster (3) and shock clicker (4), if equipped.
All shocks installed on Timbersled snow bikes are equipped with spring preload adjusters. For factory spring settings, see the suspension setup section for your particular model. Prior to adjusting spring preload, always lay the snow bike on its side or elevate it off the ground. The shocks must be fully extended for proper preload adjustment.
Caution: DO NOT EXCEED the MIN/MAX preload values (defined by the tables in this article). Never adjust spring preload shorter than the minimum allowable length. Adjusting shorter than this length could result in damage to the suspension. Failure to comply may result in injury or damage to equipment.
If you wish to customize the ride quality of your snow bike, complete the following procedure:
1. Ride your snow bike. Test ride your snow bike on your preferred terrain to feel out the factory suspension settings prior to making any adjustments. Optimal suspension settings can change depending on terrain and skill level.
2. Turn the bike on its side or elevate it so the shocks are fully extended. Always perform shock spring preload adjustments with the weight of the vehicle removed from the shock and the shock at full extension. Make spring preload adjustments in small increments (approximately 1/16 of an inch) and test ride the quality between adjustments.
3. Tune the vehicle balance using the rear shock preload adjuster. Adjusting the rear shock's spring preload affects the smoothness of your ride by controlling the amount of weight transferred. Heavier riders will typically require more preload than lighter riders. A spanner wrench (part number 2871095-329) is needed to adjust the preload on IFP and Walker Evans® shocks.
- For LESS weight transfer, increase the rear shock spring preload by turning the preload adjuster clockwise.
- For MORE weight transfer, decrease the rear shock spring preload by turning the preload adjuster counter-clockwise.
For RIOT bikes with monotube shocks (shocks with NO clickers), the front track spring preload also can be decreased to decrease ride stiffness. It can be increased to increase ride stiffness and reduce bottoming out. However, for RIOT bikes equipped with clickers, using the clickers is typically the best way to adjust for these ride quality characteristics. Ski-to-ground pressure can be adjusted with the rear track shock clicker alone or in combination with spring preload settings.
4. Tune ski pressure. Manipulating the front shock spring preload in addition to the rear also will adjust the snow bike's ski-to-ground pressure. If the ski-to-ground pressure is too heavy or light, the bike may experience difficulties in steering and stability on certain terrain.
- If the ski-to-ground pressure is TOO HEAVY, increase the front shock spring preload and decrease the rear shock preload.
- If the ski-to-ground pressure is TOO LIGHT, decrease the front shock spring preload and increase the rear shock preload.
For improved handling and additional control of the front ski, the Timbersled TRIO front shock can be added to the front forks and spindle.
Standard RIOT Models: Timbersled IFP Shocks
All standard RIOT models have Timbersled Internal Floating Piston (IFP) Shocks for both the front track and rear track. They utilize spring load adjusters to customize weight transfer and ski-to-ground pressure.
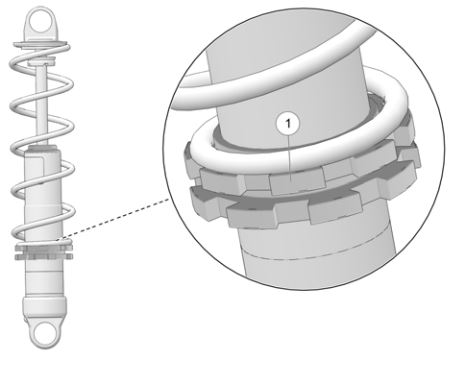
Timbersled IFP shocks are only adjustable through the spring preload (1). They do not have clickers for adjusting compression and rebound damping. Although the factory spring preload settings are usually sufficient for most riders, if you find adjustment is needed, NEVER adjust the spring preload beyond the minimum and maximum spring preload settings. Never adjust spring preload shorter than the minimum allowable length. Adjusting shorter than this length could result in damage to the suspension. Failure to comply may result in injury or damage to equipment.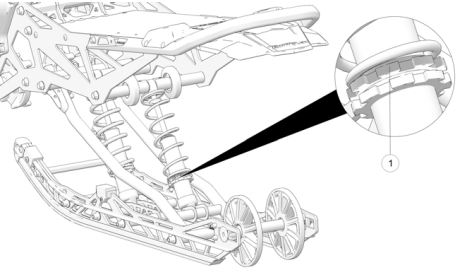
To customize the ride quality of a snow bike with Timbersled IFP shocks, complete the following procedure:
1. Ride your snow bike. Test ride your snow bike on preferred terrain to feel out the factory suspension settings prior to making any adjustments. Optimal suspension settings can change depending on terrain and skill level.
2. Tune vehicle balance using the rear shock preload adjuster (1). See above for preload instruction.
Front Shock Spring Settings
| Model | Front Shock | Spring Rate | Factory Installed Length | Minimum Allowed Length |
| RIOT 120 | Timbersled IFP | 250 | 8-1/2 in | 8-1/4 in |
| RIOT 120 S | Timbersled IFP | 450 | 6-3/4 in | 6-7/16 in |
Rear Shock Spring Settings
| Model | Front Shock | Spring Rate | Factory Installed Length | Minimum Allowed Length |
| RIOT 120 | Timbersled IFP | 80 | 8-1/2 in | 7 in |
| RIOT 120 S | Timbersled IFP | 135 | 6-3/4 in | 6 in |
RIOT LE Models: FOX® QS3 Shocks
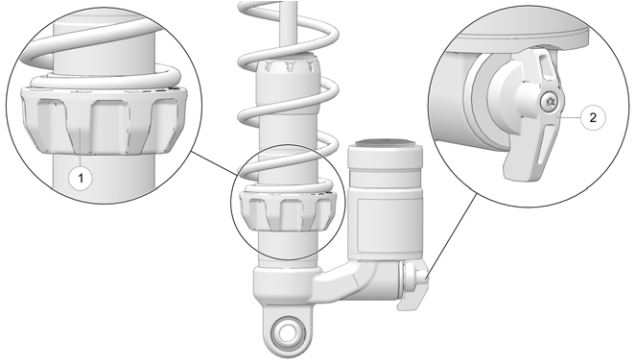
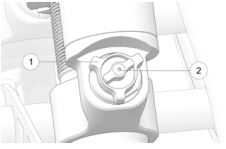
All Timbersled RIOT LE models, including the Timbersled 3-Inch model, have QS3 shocks for both the front track and rear track. FOX® QS3 shocks are spring preload adjustable (1) and have clickers (2) for adjusting compression damping. This allows you to customize weight transfer and shock compression. DO NOT EXCEED the MIN/MAX preload values (defined by the tables in this article). Never adjust spring preload shorter than the minimum allowable length. Adjusting shorter than this length could result in damage to the suspension. Failure to comply may result in injury or damage to equipment.
Remember to adjust your snow bike's spring preload first before moving on to adjust the clickers. If spring preload adjustment is needed, never adjust the QS3 shocks beyond their min/max preload values. Compression damping slows down (dampens) the shock compression that happens when the snow bike hits a dip, bump or other disturbance. The higher the compression damping, the slower the shocks will compress when encountering a disturbance.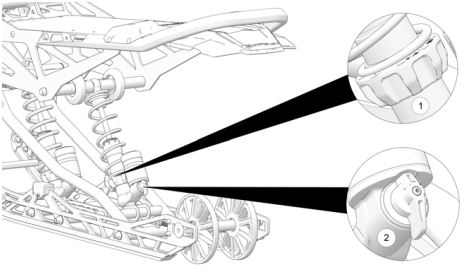
To customize the ride quality of a snow bike equipped with FOX® QS3 shocks, complete the following procedure:
1. Ride your snow bike. Test ride your snow bike on preferred terrain to feel out the factory suspension settings prior to making any adjustments. Optimal suspension settings can change depending on terrain and skill level.
2. Tune vehicle balance using the rear shock preload adjuster (1). See above for preload instruction.
3. Adjust shock compression using shock clickers (2). Tune the firmness of your ride by adjusting the shock clickers on the FOX® QS3 shocks. QS3 clickers have the following three positions:
- Soft: Turn the clicker all the way to its farthest counterclockwise position to achieve a softer or more plush ride with the least amount of compression damping.
- Medium: Turn the clicker one click from its soft position to achieve an intermediate ride (between soft and firm) with a medium amount of compression damping.
- Firm: Turn the clicker two clicks clockwise from its soft position for a stiffer ride with the highest amount of compression damping.
When ascending steep inclines with the Timbersled RIOT LE, temporarily turn the rear track clicker on the QS3 shocks clockwise to its highest compression damping setting to help the ski remain in contact with the ground during the ascent.
Front Shock Spring Settings
| Model | Front Shock | Spring Rate | Factory Installed Length | Minimum Allowable Length |
| RIOT 120 LE | FOX® QS3 | 250 | 8-1/2 in | 8-1/4 in |
| RIOT 120 S LE | FOX® QS3 | 450 | 6-3/4 in | 6-7/16-in |
Rear Shock Spring Settings
| Model | Front Shock | Spring Rate | Factory Installed Length | Minimum Allowable Length |
| RIOT 120 LE | FOX® QS3 | 250 | 8-1/2 in | 7 in |
| RIOT 120 S LE | FOX® QS3 | 450 | 6-3/4 in | 6 in |
RIOT Velocity Models: Walker Evans® Velocity Shocks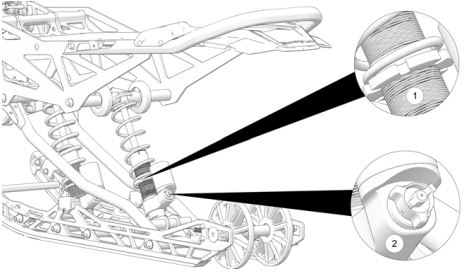
Timbersled RIOT Velocity snow bikes are equipped with Walker Evans® Velocity shocks that utilize spring preload adjusters and clickers to customize weight transfer and shock compression. DO NOT EXCEED the MIN/MAX preload values (defined by the tables in this article). Never adjust spring preload shorter than the minimum allowable length. Adjusting shorter than this length could result in damage to the suspension. Failure to comply may result in injury or damage to equipment.
To customize the ride quality of a snow bike equipped with Walker Evans® Velocity shocks, complete the following procedure:
1. Ride your snow bike. Test ride your snow bike on preferred terrain to feel out the factory suspension settings prior to making any adjustments. Optimal suspension settings can change depending on terrain and skill level.
2. Tune vehicle balance using the rear shock preload adjuster (1, above). See above for preload instruction.
3. Adjust shock compression using the shock clickers (2, above). The Walker Evans® Velocity shocks come equipped with a black inside clicker and a red outside clicker. These clickers adjust the shock compression for high- and low-speed trail events. Note that "speed" refers to the rate of shock compression, not the speed of the vehicle.
- The outside clicker (1, below) adjusts the shock compression during high-speed compression events (trails whoops, trail chatter, etc.). Turn the clicker clockwise to increase compression and counterclockwise to decrease compression.
- The inside clicker (2, below) adjusts the shock compression during low-speed compression events (takeoff, G-outs, etc.). Turn the clicker clockwise to increase compression and counterclockwise to decrease compression.
Shock Spring Settings
| Shock Location | Shock Type | Spring Rate | Factory Installed Length | Minimum Allowable Length |
| Front Track | Walker Evans® Velocity | 250 | 8-1/2 in | 8-1/4 in |
| Rear Track | Walker Evans® Velocity | 80 | 8-1/2 in | 7 in |
Timbersled Suspension Strut SX Shocks (if Equipped)
The Timbersled Strut SX Shock Body suspension system (TSS) is designed to increase your snow bike's performance and enhance responsive steering and handling. The TSS is intended to work in harmony with the in-track rear suspension to create a dual rear suspension feel that is unique to a Timbersled snow bike. It is not intended to have a soft, squishy feel like the stock motorcycle rear suspension, and it's important that you do not try to tune it to feel this way. For maximum suspension performance, follow the tuning instructions.
Note that installation instructions are provided with the TSS accessory kit. For replacement instructions, see your Timbersled Dealer.
The TSS shock O-ring, found on the outer shock body, is designed to gauge the amount of shock travel. To measure the amount of shock travel using the O-ring, follow these steps:
1. Slide the O-ring down to the lowest position.
2. Ride the snow bike for approximately 10 minutes. Then shut down the engine and dismount the bike.
3. Elevate the snow bike so the weight of the vehicle is removed from the shock and the TSS shock is at full extension.
4. Measure how much the O-ring has moved. To do this, measure the distance between the O-ring's starting point (when moved down to its lowest point) and the O-ring's current location after a 10-minute ride.
The O-ring movement equals the amount of TSS shock travel. The TSS shock has a max travel distance of 1.5 inches to bottom out. It is recommended that the targeted amount of shock travel be about 1-1/8 inches of stroke.
5. Tune the TSS shock in increments of 25 psi to reach the targeted amount of shock travel (1-1/8 inches) and accomplish perfect calibration. Each time you make a pressure adjustment (of 25 psi), slide the O-ring back down to its lowest point and ride for approximately 10 minutes before rechecking your shock travel distance.
The TSS shock is preset from the factory with 260 psi. Use a FOX® Float air pump to adjust the spring rate and preload of the TSS shock. Your shock will have a sticker on it with the minimum, maximum and factory pressure settings. The suggested TSS pressures can be found in the following table. DO NOT EXCEED the minimum or maximum pressure values specified below. Pressurizing above or below these settings could result in damage to the suspension. Failure to comply may result in injury or damage to equipment.
Suggested TSS Pressures
| Setting | PSI |
| Minimum Setting | 200 |
| Factory Setting | 260 |
| Maximum Setting | 400 |
To tune the TSS shock:
1. Turn the bike on its side or elevate it so the weight of the vehicle is removed from the shock.
2. Remove the shock's silver valve cap (1).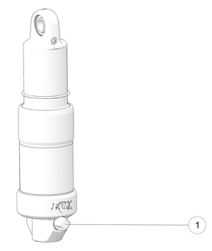
3. Thread the pump onto the shock's valve stem until the pump pressurizes and the supplied pressure is readable on the gauge. During pressurization of the air pump, the shock will depress 20 psi to fill the pump hose. When checking the air pressure, compensate for this loss by adding 20 psi to the reading.
4. When finished, detach the air pump. When tuning your TSS shock, add or subtract air pressure in increments of 25 psi at a time. Do not get snow or water inside the valve stem. This could cause an air leak in the shock. After each 25 psi increment of adjusted air pressure, slide the O-ring back to the lowest position and ride your snow bike for approximately 10 minutes before re-checking the shock travel distance.
Timbersled TRIO Kit
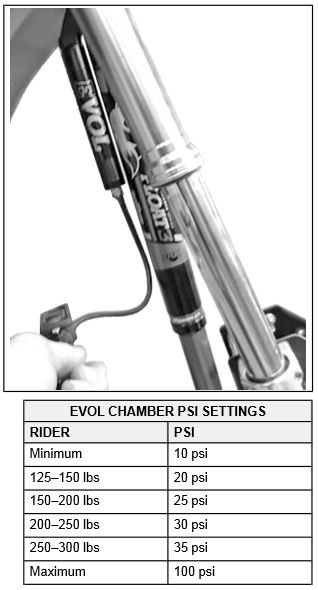
The Timbersled TRIO is an accessory front shock. To change the air pressure, first use the supplied shock pump to set the air pressure in the EVOL chamber. To do so, locate the lower Schrader valve and attach the supplied pump. See the chart below for the recommended setting. To ensure proper ride characteristics, always set the pressure in the EVOL chamber first. Make sure the ski is off the ground so the shock is not under load and is fully extended before setting air pressures.
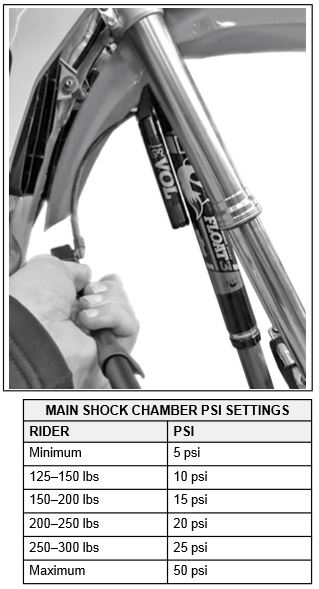
Next, set the air pressure in the main shock chamber. To do so, locate the TRIO’s uppermost Schrader valve and attach the supplied pump. Pump to the recommended setting shown on the chart below.
Ensure all tools are accounted for and all steps have been completed. DO NOT exceed maximum pressures. Contents of shock are under pressure. Never incinerate or puncture and never disassemble without consulting your service manual. Any of those may result in serious injury or death.
EVOL air chamber tuning tips:
- The infinitely adjustable pressure setting in the extra volume (EVOL) air chamber regulates spring rate in the final portion of the stroke and controls the bottom-out characteristics of the shock. Increasing air pressure in the EVOL air chamber will give a more progressive spring curve to protect against harsh bottom-outs. Decreasing air pressure will provide a more linear curve to maximize usable travel.
- When combined with the infinite adjustability of the main air spring, the EVOL air chamber allows the shock’s spring curve to be tuned for any conceivable ride weight and/or terrain condition. The pressure in the EVOL air chamber is adjusted to control the bottom-out characteristics of the shock.
FOX® Float tuning tips:
- Your TRIO main shock chamber is a FOX® Float shock specifically designed for Timbersled to increase spring rate, maintain ride height and improve the overall ride and handling characteristics of the snow bike.
- For Timbersled TRIO shock applications, the recommended main chamber air pressure settings shown above are unique to the Timbersled TRIO application and should be followed to achieve the best overall ride characteristics.
- The spring rate is controlled by air pressure in the main body. Air pressure is infinitely adjustable, making Float the most progressive and adjustable air shock on the market.
For more information about TRIO, see the installation instructions for the TRIO kit.
More maintenance information can be found in your Owner's Manual.
To view diagrams and find replacement part numbers, view the online parts catalog.
FOX® is a registered trademark of Fox Factory Inc.
Walker Evans® is a registered trademark of Walker Evans Enterprises Corp.
YouTube® is a registered trademark of Google LLC
Unless noted, trademarks are the property of Polaris Industries Inc.
© 2021 Polaris Inc.


