


Proper track maintenance is an important part of keeping your Timbersled ARO, Timbersled RIOT or Timbersled 120 SX snow bike system ready to ride. You should inspect the track alignment and track tension as part of your pre-ride inspection.
Always wear safety glasses and nitrile gloves when servicing your Timbersled snow bike system. Note that moving parts can cut and crush body parts. When performing the recommended checks and adjustments, stay clear of all moving parts. Never perform track measurements or adjustments with the engine running.
To inspect your track:
1. Using a hoist, safely lift and support the rear of the snow bike off the ground.
2. Rotate the track by hand to check for damage.
3. Carefully examine the track along the entire length of each rod. Bend the track to check for breakage.
4. Replace the track if any rod damage is found. Broken track rods can cause a rotating track to come off the snow bike, which could cause serious injury or death. Never operate your snow bike with a damaged track. Never rotate a damaged track under power.
Track Alignment
Proper track alignment is an essential factor in proper snow bike handling and in preventing excessive wear to the track and rail slides (hifax).
To inspect the track alignment, follow the steps below.
1. Elevate the track off the ground using a stand.
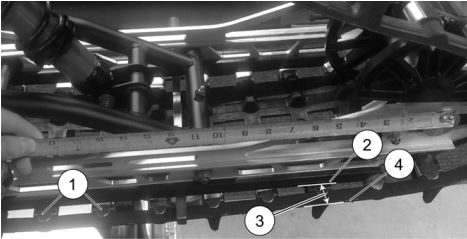
2. Idle the bike in gear for several revolutions. Inspect whether the track is revolving evenly. Note that the track is properly aligned when the track clips (1) run evenly along the hifax (2) and the track is centered on the suspension.
3. Shut off the engine.
4. Measure the horizontal distance between the hifax and the track edge (4) on both sides of the bike.
5. If the track is aligned properly, both sides should measure approximately the same distance.
If the track is running too far to one side, the track alignment must be adjusted.
To adjust the track alignment, follow the steps below.
1. Loosen the axle bolt (5).
2. Loosen the adjustment bolt jam nuts (8 and 9).
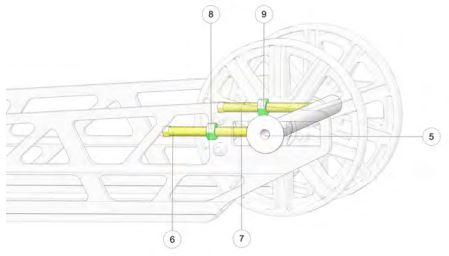
3. If the track is running too far to the left, turn the right tension adjustment bolt (7) clockwise approximately one-half turn. If the track is running too far to the right, turn the left tension adjustment bolt (6) clockwise approximately one-half turn.
Tune the adjust bolt one half-turn at a time. Check the alignment between adjustments to determine if additional adjustment is needed.
4. When the track is revolving evenly along the hifax, tighten the adjustment bolt jam nut and torque the axle bolt to 36.9 ft-lbs (50 Nm).
5. Idle the bike in gear for several revolutions for the track alignment adjustment to take full effect. Observe the running track for several additional revolutions.
6. Shut the engine off. When aligned properly, the track should run straight and centered on the suspension rails.
7. Re-measure the horizontal distance (3) between the hifax and the track edge on both sides of the bike.
- If the track is properly aligned, the distance between the hifax and the track edge is approximately the same on both sides and the track appears to run centered on the rails.
- If the track is not properly aligned, the distance between the hifax and the track edge is NOT the same on both sides of the bike and the track is NOT centered on the rails. If the track is not properly aligned, repeate steps 1 through 5 until it is.
Adjusting the track alignment will alter the tension of the track. When the track is properly aligned, measure the track tension and adjust if necessary.
Track Tension
A proper track tension adjustment is critical for proper snow bike handling. Always maintain proper track alignment and tension. Each track is slightly unique and will break in a bit differently, depending on on where and how you ride. Always ensure proper track tension. Operating your snow bike with too loose or too tight of a track could cause the rails to pierce the track. Stabbing a track may result in bodily harm and/or damaged equipment.
Look for track tension warning signs. If the track is too loose, it might skip on the drivers. If it is too tight, the rail sliders (hifax) might wear quickly.
Before measuring and adjusting the track tension, ensure the track is properly aligned.
1. Using an appropriate hoist or stand, safely lift and support the rear of the snow bike off the ground.To measure the track tension, do the following.
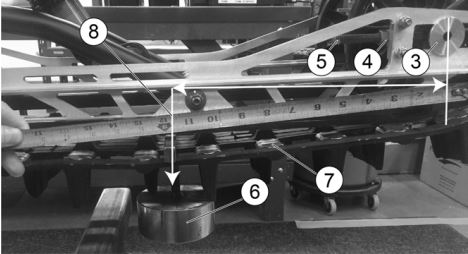
2. Place 10 pounds of downward pressure (6) on the track 10 to 15 inches in front of the rear axle (8).
3. At the measurement location (8), measure the vertical slack or space (9) between the bottom of the hifax/rail slider (1) and the wear surface of the track clip (7). This is the slack measurement (9).
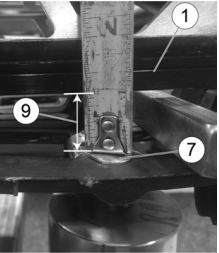
4. If the track is properly tensioned, the slack measurement (9) should be between 3/4-inch and 1 inch.
If the slack measurement (9) is less or greater than the proper slack measurement, the track tension should be adjusted.
If the track starts to skip on the drivers, the track is too loose and needs to be adjusted. Occasionally this will happen after a new track has been run.
To adjust the track tension, do the following.
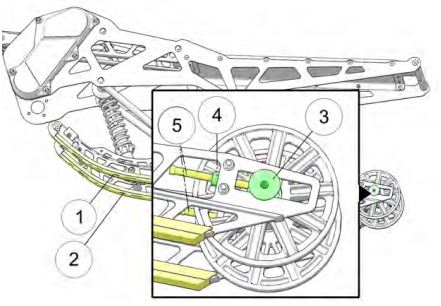
1. With the rear of the bike off the ground and properly supported by a stand, loosen the axle bolt (3) on the track tensioning block.
2. Loosen the adjustment bolt's jam nut (4).
3. Then tighten or loosen the tension adjustment bolt (5) a half-turn at a time on both the right and left sides of the bike. Turn the adjustment bolts the same amount on both sides of the track to tension the track evenly and keep the track aligned (track alignment should be performed before measuring and adjusting track tension).
Turning the adjustment bolts (5) on each side of the bike to the right will push the rear axle (3) back and tighten track tension.
Turning the adjustment bolts (5) on each side of the bike to the left will allow the rear axle (3) to move forward toward the front of the bike, putting less tension on the track.
4. Re-tighten the adjustment bolt's jam nut.
5. Torque the axle bolt to 36.9 ft-lbs (50 Nm).
6. With the bike still secure and the track off the ground, rotate the track several times by hand or by running the engine in gear for several seconds. Then stop or turn the bike off. It takes several track revolutions for track adjustment to take effect.
7. Measure the track tension again. If the slack measurement (9) is within the proper slack measurement range, your track tension is set properly. If the track tension is tsill too loose or too tight, repeat the steps above until your track tension is set properly.
8. Once the track tension is set, check to ensure the track is still properly aligned.
For more information, see your authorized Timbersled Dealer. To find a dealer near you, use the Dealer Locator.
Maintenance tips, procedures and specifications can be found in your Owner's Manual.
To find diagrams and replacement part numbers, use the online parts catalog.
Unless noted, trademarks are the property of Polaris Industries Inc.
© 2022 Polaris Industries Inc.


