


Always wear safety glasses and nitrile gloves when servicing your Timbersled snow bike system. To remove and replace the skags on your Timbersled ARO, Timbersled RIOT, Timbersled 120 SX or Timbersled Ripper snow bike system, follow these steps. Note that worn skis and/or skags will adversely affect handling. Loss of vehicle control may result, causing serious injury or death.
Check your skags before each use of the snow bike to ensure positive steering characteristics. Skags must be replaced when worn to half their original diameter. Carbide skags must be replaced if any abnormal wear or chipping is found.
To change the skags:
1. Raise and support the front of the snow bike so the ski is approximately 6 inches (15.2 cm) off the ground.
2. Remove the attaching nuts (1) and pry the skag (2) downward. Note that Ripper models may have three fasteners instead of two.
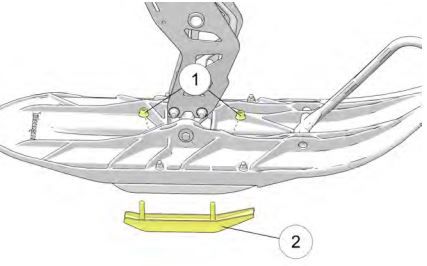
3. Remove the front end of the skag.
4. Remove the rear end of the skag.
5. Reverse the steps to install a skag. Torque the fasteners to 13 ft-lbs (18 Nm). If replacing the skags, refer to your Owner's Manual for the replacement skag part number.
For more information, see your authorized Timbersled Dealer. To find a dealer near you, use the Dealer Locator.
Maintenance tips, procedures and specifications can be found in your Owner's Manual.
To find diagrams and replacement part numbers, use the online parts catalog.
Unless noted, trademarks are the property of Polaris Industries Inc.
© 2022 Polaris Industries Inc.


