


Before operating your Timbersled snow bike system, perform a proper pre-ride inspection as described in your Timbersled Owner's Manual and the host bike's Owner's Manual.
Inspect all items on the below checklist for proper operation or condition before each use of your snow bike. Before starting the engine, reference your host bike's Owner's Manual for the engine starting process and safety warnings. Operating the vehicle with worn, damaged or malfunctioning components could result in serious injury or death. Never start the engine without checking all vehicle components to be sure of proper operation.
Steering System
Ice and snow buildup may interfere with the steering of your snow bike, resulting in serious injury or death. Keep your vehicle free of snow and ice.
Before driving, manually turn the ski to the left and right to be sure ice and snow are not interfering with full left and full right steering. If difficulty is encountered, remove the ice and snow buildup that may be obstructing the steering linkage or front ski and skags.
Ensure the fork clamps, spindles and ski bolts, and front axle bolt are torqued properly.
Brakes
Always check your brakes for proper operation before starting the engine.
Squeeze the brake lever. It should move no closer to the handgrip than 1/2-inch (1.3 cm). A smaller distance indicates a low brake fluid level or air in the hydraulic system. Your Timbersled Dealer can provide assistance.
If the brake lever feels spongy when squeezed, check the brake fluid level and condition. Continued use of spongy brakes may cause a complete loss of brakes, which could result in serious injury or death. Always have the brakes serviced at the first sign of sponginess.
To gain 100-percent braking performance, Timbersled recommends performing 20 to 50 stop cycles of the Timbersled brake system before the first ride. Brake cycles should be performed at a slow, controlled speed in a flat, open environment. Start the snow bike and engage it into gear. Allow the track to spin three to five full rotations. Apply moderate pressure to the brake until the track is completely stopped and is no longer spinning. Then repeat as necessary.
Suspension
Loose nuts and bolts can reduce your snow bike's reliability and cause needless repairs and downtime. A visual inspection prior to beginning a ride will uncover potential problems.
Check the suspension mounting bolts, the rear idler wheel bolt, the rear idler adjusting bolt locknuts and the swing arm pivot bolt for tightness.
For more on adjusting the suspension, read the article that applies to your snow bike:
- Customizing Your ARO Suspension Setup
- Customizing Your RIOT Suspension Setup
- Customizing Your Timbersled 120 SX Suspension
- Customizing Your RAW Suspension Setup
Skags (Wear Bars)
Check your skags before each use of the of the snow bike to ensure positive steering characteristics. Skags must be replaced when worn to half their original diameter. Carbide skags must be replaced if any abnormal wear or chipping is found.
Worn skis and/or skigs will adversely affect handling. Loss of vehicle control may result, causing serious injury or death.
The skag replacement procedure for most models can be found in Timbersled Skag Replacement. For more information, consult your Owner's Manual.
Ski Saddle and Spindle Bolts
Check the ski spindle bolts for tightness. The spindle itself does not require any maintenance. It is designed to bend if it comes in contact with a rock or stump during operation. Timbersled recommends thoroughly inspecting the assembly for bends or cracks before you ride.
Track Alignment, Tension and Condition
Operating your snow bike with a damaged track increases the possibility of track failure, which could cause loss of control, resulting in serious injury or death. Always inspect the track for damage before using the vehicle. Broken track rods can cause a rotating track to come off the snow bike, which could cause serious injury or death. Never operate with a damaged track. Never rotate a damaged track under power.
Proper track alignment is an essential factor in proper snow bike handling and in preventing excessive wear to the track and rail slides.
For details on how to inspect your track, check and adjust the track alignment, and measure and adjust the track tension, read Timbersled Track Maintenance or consult your Owner's Manual.
Use of traction products such as studs increases the possibility of track damage and/or failure. Driving at high speeds for extended periods of time in marginal lubrication could severely damage track rods, break track edges and cause other track damage. Examples of marginal lubrication would include frozen bodies of water without snow cover, icy trails and no-snow conditions.
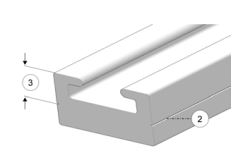
Rail Slide Condition
Timbersled rail slides (1) run along the bottom of the rail to prevent track wear. Both the left and right rail slides should be inspected and replaced when necessary.

For ease of inspection, all Timbersled rail slides have a wear limit indicator groove (2) to indicate the minimum permissible slide thickness (3). Replace the rail slides if they are worn to the top of the groove at any point along their length. Failure to do so may result in permanent damage to the track or rails.
Chain Tension
Check both the chaincase chain and engine drive chain for wear and tension.
For long chain life and reliability, it is extremely important that you keep the drive chain adjusted properly. Always check the drive chain tension before riding. For details on how to measure the drive chain tension and adjust the tension if necessary, read Timbersled Drive Chain Maintenance or see your Owner's Manual.
Lubricate the chains every 8 to 10 hours of operation.
It is recommended that you measure the chaincase chain tension each time the chain is lubricated. Do no over-tension the chain. Improper chain tension can cause excessive wear to the chain and the tension roller bolt. For details on how to measure the chaincase chain tension and adjust the tension if necessary, read Timbersled Chaincase Chain Maintenance or see your Owner's Manual.
You also can find how to perform a proper chain inspection in your Owner's Manual.
Host Bike Inspection
Perform all pre-ride inspections and procedures as described in your host bike's Owner's Manual. These include checking the coolant and injection oil levels, inspecting the ignition switch and inspecting the headlight, taillight and brake light.
For more information, see your authorized Timbersled Dealer. To find a dealer near you, use the Dealer Locator.
Maintenance tips, procedures and specifications can be found in your Owner's Manual.
To find diagrams and replacement part numbers, use the online parts catalog.
Unless noted, trademarks are the property of Polaris Industries Inc.
© 2022 Polaris Industries Inc.


