


The break-in period for your Timbersled snow bike system is the first three hours of operation. Drive with extra caution during this break-in period. Perform regular checks on fluid levels, lines and all other important areas of the snow bike.
Lubricate your drive chain and chain case chain. Check the tension on the chain. Check for leaks in the brake line connections. Check the track tension. Re-torque the swing arm bolt, strut rod bolts, front axle and ski bolt.
Before starting the engine, reference your host bike's Owner's Manual for the engine starting process and safety warnings. Operating the vehicle with worn, damaged or malfunctioning components could result in serious injury or death. Never start the engine without checking all vehicle components to be sure of proper operation.
To gain 100-percent braking performance, we recommend performing 20 to 50 stop cycles of the Timbersled brake system before your first ride. Brake cycles should be performed at a slow, controlled speed in a flat, open environment. Start the snow bike and engage it into gear. Allow the track to spin three to five full rotations. Apply moderate pressure to the brake until the track is completely stopped and is no longer spinning. Repeat as necessary.
After break-in, pay attention to the following maintenance items.
Steering System
Before driving, manually turn the ski to the left and right to be sure ice and snow are not interfering with full left and right steering. If difficulty is encountered, remove ice and snow buildup that may be obstructing the steering linkage or front ski and skags. Ice and snow buildup may interfere with the steering of your snow bike, resulting in serious injury or death. Keep the vehicle free of snow and ice.
Ensure the fork clamps, spindle and ski bolts, and front axle bolt are torqued properly.
Brakes
Squeeze the brake lever. It should move no closer than 1/2 inch (1.3 cm) to the handgrip. A smaller distance indicates low brake fluid level or air in the hydraulic system. Your Timbersled Dealer can assist. To find a dealer near you, use the Dealer Locator.
If the brake lever feels "spongy" when squeezed, check the brake fluid level and condition.
The brake fluid level can be seen through a plastic sight glass in the brake reservoir. If the fluid is sufficient, the sight glass will be black. If the sight glass is any color other than black, add brake fluid.
Replace brake fluid at least every two years with DOT 4 high temperature brake fluid or an equivalent product.
After opening a bottle of brake fluid, always discard any unused portion. Never store or use a partial bottle. Brake fluid is hygroscopic, meaning it rapidly absorbs moisture from the air. The moisture causes the boiling temperature of the brake fluid to drop, which can lead to early brake fade and the possibility of accident or serious injury.
Continued use of "spongy" brakes may cause a complete loss of brakes, which could result in serious injury or death. Always have the brakes serviced at the first sign of sponginess.
Brake pads must be replaced when the brake pad material becomes thinner than 1/16 inch (1.5 mm). A kit is available for replacing brake pads. Your Timbersled Dealer can assist.
Track
Track damage or failure caused by operating on ice or poor lubrication conditions voids the track warranty.
Operating the snow bike with a damaged track increases the possibility of track failure. This could cause loss of control, resulting in serious injury or death. Always inspect the track for damage before operating the snow bike.
Use of traction products such as studs increases the possibility of track damage and/or failure. Driving at high speeds for extended periods of time in marginal lubrication could severely damage track rods, break track edges and cause other track damage. Examples of marginal lubrication would include frozen bodies of water without snow cover, icy trails and no-snow conditions.
To inspect the track:
- Using a hoist, safely lift and support the rear of the snow bike off the ground.
- Rotate the track by hand to check for damage.
- Carefully examine the track along the entire length of each rod. Bend the track to check for breakage.
- Replace the track if any rod damage is found.
Broken track rods can cause a rotating track to come off the snow bike, which could cause serious injury or death. Never operate with a damaged track. Never rotate a damaged track under power.
Adjust the track only if it starts to skip on the drivers. This sometimes happens with new tracks after they have been run. Proper track tension should be 1/2-inch to 3/4-inch free hang from the top of the track clip to the bottom of the rail slide at its lowest hanging point. Adjust equally on both sides for the track to run true.
Track Warmup
A loose track or flying debris could cause serious injury or death. Stand clear of the front of the snow bike and the moving track. never hold the snow bike off the ground or stand behind it while warming up the track. Do not use excessive throttle during warmup or when the track is free-hanging. Use a stable rear support.
Follow these steps to ensure proper warmup of the engine, drive train and track:
1. Use an appropriate stand to securely support the rear of the snow bike at the rear bumper. The track should be about 4 inches (10 cm) off the ground.
2. Start the engine and allow it to warm up 2 to 3 minutes.
3. Engage the throttle abruptly and allow the track to rotate several revolutions. Note that it will take longer to warm up the track sufficiently during colder outdoor temperatures.
4. Release the throttle, apply the brakes, shut off the engine and lower the snow bike to the ground.
5. Grasp the ski by the front loop and move it from side to side to loosen snow and ice.
Slide Rail
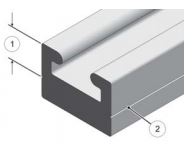
Timbersled rail slides run along the bottom of the rail to prevent track wear. The rail slide should be inspected periodically and replaced when necessary. For ease of inspection, all Timbersled rail slides have a wear limit indicator groove (2) to indicate the minimum permissible slide thickness (1). Replace the rail slides if they are worn to the top of the groove at any point along their length. Failure to do so may result in permanent damage to the track or rails.
Inadequate cooling and lubrication will lead to overheating of the slide rail and track, resulting in premature wear and failure. Reduce speeds and frequently drive into fresh snow to allow adequate cooling and polishing of the slide rail and track surfaces. Avoid operating on ice, hard-packed surfaces or roads.
The slide rail needs snow for lubrication. Excessive wear indicates insufficient lubrication. A new rail slide can cause faster heat buildup in limited lubrication, resulting in excessive wear.
Operating with insufficient lubrication between the rail slide and track guide clips can cause track failure, loss of vehicle control and loss of braking ability, which can result in serious injury or death. Avoid operating for extended periods on ice and other surfaces that have little or no snow for lubrication.
Inspect the rail slides regularly for wear and replace them if they have thin spots. Rail slide wear can be prevented by making sure snow is spraying on them when riding on the trail. It is recommended to install ice scratchers on the rails if frequently riding on hard pack snow conditions. The rails are pre-drilled for this. See your Timbersled Dealer for more information on ice scratchers.
If excessive rail slide wear occurs due to poor snow conditions, additional wheel kits are available. Your Timbersled Dealer can provide more information.
Deep Lug Track Operation
Deep lug tracks are designed specifically for operation in deep snow conditions. Operation with deep lug tracks on low snow, hard-packed trails, ice or at high speeds may cause track overheating, track lug separation and/or rail slide damage.
Track damage attributed to track overheating and/or lug separation is not covered under the Timbersled limited warranty policy.
Timbersled ARO 3-inch models have a recommended maximum sustatined speed limit of 50 mph. To avoid track/lug damage, never exceed this maximum recommended sustained speed.
Suspension Maintenance
Loose nuts and bolts can reduce your snow bike's reliability and cause needless repairs and down time. Before beginning any ride, a visual inspection will uncover potential problems. On a weekly basis or before any long trip, check suspension mounting bolts, the rear idler wheel bolt and rear idler adjusting bolt locknuts for tightness. Check the front torque arm limiter strap condition. And check the rail slide condition.
Chain Lubrication
Lubricate the chains every 8 to 10 hours of operation. We have found the use of Maxima Chain Wax for O-ring chains works best. It is recommended to lift the track off the ground. Start the bike and put it into first gear and let the clutch out allowing the drive system to spin. Slowly spray lube directly onto the chain rollers and O-rings, soaking the chain. This will allow good penetration into the moving chain parts.
Ski Maintenance
Timbersled recommends periodically inspecting your ski for damage.
- Check the ski bolt to make sure it is tight. Torque to 33 ft-lbs (45 Nm). Failure to torque fasteners as directed will adversely affect the steering system and may lead to severe injury or death.
- Inspect for cuts or peeled-up plastic that will cause the ski to handle poorly.
- Inspect for bent, broken or worn-out ski skags.
- Inspect the ski saddle for bends that may make the ski crooked.
- Inspect the ski rubber to make sure it is not smashed or worn out.
Timbersled highly recommends that you DO NOT tie your bike against the front of the ski. This can permanently bend the plastic ski, causing your bike to handle poorly.
Ski Skags
Worn skis and/or skags will adversely affect handling. Loss of vehicle control may result, causing serious injury or death. See your dealer's studding chart for recommended skags.
Check skags before each use of the snow bike to ensure positive steering characteristics. Skags must be replaced when worn to half their original diameter.
Carbine skags must be replaced if any abnormal wear or chipping is found.
To replace a skag:
- Raise and support the front of the snow bike so the ski is approximately 6 inches (15.2 cm) from the ground.
- Remove the attaching nuts and pry the skag downward.
- Remove the front end of the skag.
- Remove the rear end of the skag.
- Reverse the steps to install a skag.
Fuel
See your host bike's Owner's Manual for fuel recommendations.
Operating with obstructed fuel systems will result in serious engine damage. Perform maintenance as recommended. Prolonged exposure to petroleum-based products may damage paint. Always protect painted surfaces when handling fuel.
Some warnings:
- Gasoline is highly flammable and explosive under certain conditions.
- Always exercise extreme caution whenever handling gasoline.
- Always follow the safety procedures outlined in your host bike's Owner's Manual.
- Always refuel outdoors or in a well-ventilated area.
- Always turn off the engine before refueling.
- Do not overfill the tank. Do not fill the tank neck.
- Do not smoke or allow open flames or sparks in or near the area where refueling is performed or where gasoline is stored.
- If gasoline spills on your skin or clothing, immediately wash it off with soap and water and change clothing.
- Never start the engine or let it run in an enclosed area. Engine exhaust fumes are poisonous and can cause loss of consciousness or death in a short time.
Daily Storage
At the end of each ride, park your snow bike on a level surface and support it at the rear with an appropriate track stand. The track should be suspended approximately 4 inches (10 cm) off the ground.
Remove the key (if applicable) and cover the snow bike.
For further maintenance instructions and more information about your snow bike, consult your Owner's Manual.
Unless noted, trademarks are the property of Polaris Industries Inc.
© 2022 Polaris Industries Inc.


